Branding & Customization
Add your own branding to events and portals, and check out brand examples.
- Branding Best Practices
- Event Branding & Customization
- Portal Branding and Customization
- Branding Examples
- Branding Examples - Attendee Portals
- Branding Examples - Bar Layouts
- Branding Examples - Open Layouts
- Event Branding
- Add social sharing to the registration page
- Add sponsor logos to the event window
- Add text, images, and other media to the registration page
- Button and tab color | Open layouts
- Buttons, tabs, and title bar color | Bar layouts
- Customize landing page headings, links, and buttons
- Customize the event title and date | Bar layouts
- Customize the event title and date | Open layouts
- Event player container and window backgrounds
- Registration page background and form and content area colors
- Set up the banner and logos
- Use the text editor to customize events and emails
Branding Best Practices
For the best branding experience, follow these tips.
Jump to: Preview your event | Banners and banner logos | Background colors and images | Text colors and fonts | Footers | Sponsor logos
Note: To learn more about all the elements you can customize and how to use them, see Event branding and customization.
Preview your event
Always preview your event before making it public. At the top of the Event Summary tab click:
- View Event to register and view the event as an attendee
- Launch Live Studio to review slides, overlay videos, surveys, and other content
- Use the browser's developer tools to check how the registration page and event window look when the browser is resized and in mobile view.
Banners and banner logos
Background colors and images
- Use a color or image that complements your brand.
- Avoid using bright-colored backgrounds or images with busy patterns, as they can be distracting and take the focus away from the landing page content and event.
- If you have a lot of landing page content or a long registration form, the landing page will adjust and become longer. Make sure your background image is tall enough so that it covers the entire landing page and no white space displays at the bottom of the page.
Text colors and fonts
- On the registration page, the text is either Roboto (bar layouts) or Open Sans (open layouts).
- On the event window, the text is Open Sans.
- You can’t change the font of heading text (event title and date, for example), the registration form, or other labels.
- Text is automatically set to black or white, depending on the color behind it. (White text on dark backgrounds and black text on light backgrounds.)
- When using a background image, set the background color to a similar hue to ensure text is legible.
- The text editor lets you change the font and font color of landing page content, custom player tabs, custom portal tabs, and portal segments. Preview the results and make sure the text is legible.
Footers
On the registration page and in attendee portals:
- The background color is dark gray. You can’t change this.
- For text or links, set a light text color that stands out against the dark gray.
- Use light-colored images with a transparent background.
In the event window:
Sponsor logos
- Make sure all logos are the same height and approximately the same width, to ensure smoother transitions as the logos switch.
- Use images with a transparent background.
- Add a few pixels of padding to your images to prevent them from touching the edge of the player container.
Event Branding & Customization
The event landing page is the entrance to your event. It contains the event title and date, a registration form and login field (for people already registered), and descriptive text, speaker headshots, and other images or videos that you choose to add.
When attendees register and sign in to the event, they are taken to the event window. Depending on your webcast, the event window contains a video player where presenters appear on camera and uploaded videos are played; tabs for slides, surveys, and other content; and sidebar tabs for Q&A and audience chat.
There are so many options for customizing the appearance of your event and adding your brand that it can be difficult to know where to begin. One way is to start at the top of the page and work your way down. Set the visuals first and then build out the web content for your attendees:
Note: This article explains event branding and customization and provides links to detailed instructions. For additional information and tips, see Branding Best Practices.
Banner and logos
To learn more, see Set up the banner and logos.
Registration layouts
The layout of the landing page determines the placement of the registration form and landing page content. There are two styles:
- Bar layouts feature the event title and date prominently in colored bars across the landing page.
- Open layouts incorporate the event title and date in the body of the landing page.
To select a layout:
Go to the Player & Branding tab. Open Advanced Branding and select a Registration Layout.
The following example shows the same event styled with a bar layout (left) and open layout (right).

The following table explains the available layouts.
| Layout | Description | Preview |
|---|---|---|
| Bar layouts | ||
| One Column | A single column with landing page content first, followed by the registration form. |
|
| Two Column | Landing page content on the left and the registration form on the right. |  |
| Popup Registration | Landing page content with a Register Now button that opens the form in a small window. |  |
| Open layouts | ||
| Title Top - Left Registration | Event title and date centered above a container with the registration form on the left and landing page content on the right. |  |
| Title Top - Right Registration | Event title and date centered above a container with the landing page content on the left and registration form on the right. |  |
| Side-by-Side - Left Registration | Event title and date above landing page content with the registration form on the left. |  |
| Side-by-Side - Right Registration | Event title and date above landing page content with the registration form on the right. |  |

Colors and backgrounds
Use colors and background images to brand the look of the event landing page and event window. To set colors, go to the Player & Branding tab and open Advanced Branding. The Site Branding Options section lists page elements you can color.

The following table summarizes the options.
| Option | Description | Applies to... |
|---|---|---|
| Banner color | The color displayed behind banner logos. Set the banner to transparent to show the:
|
Landing page, event window |
| Highlight color | The color of buttons on the landing page and tabs in the event window. For bar layouts, the highlight color is also the background of the event title bar. See: | Landing page, event window |
| Date bar color | Bar layouts only. The bar with the event date, below the event title bar. See: | Landing page |
| Form container color | In a two-column layout, you can set the background color of the registration form. Remember that the highlight color sets the color of buttons; select a color that contrasts well behind the registration form.
See Registration page background and form and content area colors |
Landing page |
| Registration container color | The content area that holds the registration form and landing page content. You can set to transparent to allow the background color or image to show through.
See Registration page background and form and content area colors |
Landing page |
| Registration page background | The area behind the registration container. You can select a background color, upload a background image, or both. (Set the banner to transparent to have the page background color show through.)
See Registration page background and form and content area colors |
Landing page, event window |
| Player container | The content area that holds the banner, video player, slides and other content tabs, and chat and Q&A tabs. Set the player container to white to group all the blocks or set to transparent to show the background color or background image. | Event window |
| Player page background | The area behind the player container. By default, the player uses the registration page background. You can set a color or upload a background image specifically for the event window. | Event window |
Landing page content
All registration layouts include a dedicated space for additional content. By default, this space - called the landing text - is empty. You can edit it and include additional event information, images, speaker headshots, links, and videos on your registration page. You can also add your own custom code or use auto-fields to include the event title, date, duration, or reminder buttons on the page.
Finally, let your attendees spread the word about an event on Twitter, LinkedIn, and Facebook, and then track registrations that originate from their posts.
To learn more, see:
- Add text, images, and other media to the registration page
- Use the text editor to customize events and emails (for detailed instructions)
- Add social sharing to the registration page
Sponsor logos on the event window
You can display logos of event sponsors and other call-to-action images during the event. The logos are included in the lower right corner of the event window, above the footer.
You can include as many sponsor logos as you like. You can set the display order of the logos, the amount of time each logo is displayed, and include a link so that when attendees click on the logo, they're taken to the sponsor's website.
To learn more, see Add sponsor logos to the event window
Portal Branding and Customization
The portal landing page is the entrance to the portal. It contains the portal title, a registration form, a login form (for people already registered), and custom content you add. When you sign in to a portal, the list of events, or agenda, is displayed.
There are many options for customizing the layout and appearance of a portal. This article summarizes key options for:
- Common elements (header, footer, and colors)
- Landing page (registration and portal header and footer)
- Portal agenda (list of events and breakout sessions)
- Auto-fields to pull in details for events on the agenda and registration page
Common elements
The following table lists elements that appear on all pages of a portal.
| For... | Go to this tab and select... | Options |
|---|---|---|
| Logos or banner images | Branding tab. Banner Logo and Advanced Branding > Right Banner Logo |
|
| Colors and background image | Branding tab. Advanced Branding > Site Branding Options |
|
| Footer | Registration tab. Registration Footer | By default, the footer includes a link to System Test and FAQs. Use the text editor to add and format text, image files, and more. To update the label for the System Test link, see Customize landing page headings, links, and buttons |
Registration landing page options
The following table lists options that control the landing page and registration form.
| For... | Go to this tab and select... | Options |
|---|---|---|
| Placement of the registration form and landing page content | Branding tab. Advanced Branding > Site Branding Options > Registration Layout |
|
| Text and images on the landing page | Registration tab. Customize Event Landing Page > Landing Page Content | Include basic details or click Custom to insert text, headshots, images, or other custom content. |
| Per-event registration checkboxes on the landing page | Registration tab. Customize Event Landing Page > Landing Page Content | Next to Landing Text, select Custom If you're using registration checkboxes, use these auto-fields to let visitors register for events when they register for the portal. |
| Headings, links, and buttons shown on the registration form | Registration tab. Landing Page Labels | See Customize landing page headings, links, and buttons |
| Registration is closed message on the landing page | Event Summary tab > Portal Details > Manage Access | Replaces the registration form fields when registration is set to Closed. Add a short message (default) or click Customize Message and add text, images, or other custom content |
Portal agenda
On a portal, the list of events and breakouts is called an agenda or schedule; events and breakouts are called segments. The following table lists options that control how events and breakout sessions are listed on the portal.
| For... | Go to this tab and select... | Options |
|---|---|---|
| Navigation elements and layouts for listing events and breakouts | Portal Layout tab. Select Layout |
|
| Text above the list of events | Portal Layout tab. Intro Text | Available for any layout but Simple Layout. |
| Which details to show about each event or breakout (segment) | Portal Layout tab. Segment Formatting |
|
| Events and breakouts grouped by date | On the Portal Layout tab, select Tabs layout. Manage Segments tab. Manage Categories |
Automatic Grouping: Broadcast date tabs See Sort events and breakout sessions into categories |
| Events and breakouts grouped by categories you define | On the Portal Layout tab, select any layout but Simple Layout. Manage Segments tab. Manage Categories > New Category |
Set up categories (tracks). See Sort events and breakout sessions into categories |
| Individual registrations, by event | Portal Layout tab > Select Layout | Simple Layout or Custom Layout and select Show Checkboxes on Registration. By default, per-event registration is shown on the agenda, after the visitor signs in. To add it to the registration page, use these auto fields. See Have viewers register for individual events on a portal |
Customize event details to display (auto-fields)
Auto-fields are placeholders that automatically display specific details about each event, or linked segment, on the portal agenda. To customize the details displayed, go to the Portal Layout tab and under Segment Formatting select Custom. This opens the text editor, where you can add and apply styling to auto-fields as well as include text, images, and other elements.
Important: Segment formatting sets the content displayed for every event. Only include text or images that you would like repeated with each event block.
The format of an auto-field is __AUTOFIELD__ (the auto-field with two underscores before and after).
The following table explains the available auto-fields and the text they display.
| Auto field | Description |
|---|---|
| __SEGMENTDATE__ | Scheduled day, date, and time |
| __SEGMENTTITLE__ | Event title |
| __SEGMENTTIME__ | Scheduled time |
| __SEGMENTDESCRIPTION__ | The description you entered on the Manage Segments tab |
| __SEGMENTVIEWBUTTON__ | View Now button |
| __SEGMENTREMINDERBUTTON__ | Add to Calendar button |
Per-event registration
If you are using per-event registration, you can add event registration to the main registration page. This lets visitors register for the portal and specific events at the same time.
On the Registration tab, in the Customize Event Landing Page section next to Landing Text, select Custom. The following table explains the available auto-fields.
| Auto field | Description |
|---|---|
| __ALLSEGMENTS__ | All events linked on the portal |
| __SEGMENTBLOCK1__ | The first event linked on the portal, based on the order you set on the Manage Segments tab |
| __SEGMENTBLOCK2__ | The second event linked on the portal |
| __SEGMENTBLOCK3__ | The third event linked on the portal |
| __SEGMENTBLOCK4__ | The fourth event linked on the portal |
| __SEGMENTBLOCK#__ | The Nth event linked on the portal |
Branding Examples
Branding Examples - Attendee Portals
Attendee portals have a registration page just like events. The registration page branding (logos, colors, and images) carries through to the portal. Portal layout and segment formatting options control how events and breakout sessions are listed on the agenda. Enhanced portals add tabs with additional ways attendees can interact.
Visit these example attendee portals to compare different navigation elements, event grouping options, and enhanced portal features. The portals are branded for Alltrek.


| Portal Type | Registration Page Branding | Portal Layout & Features |
|---|---|---|
| Attendee Portal - Bar Layout | Left and right logos on white banner White registration form Page background with gradient image |
Search bar Tabs layout with 2 columns Events grouped in tabs by Broadcast Date |
| Attendee Portal - Open Layout | Left and right logos on white banner White registration form Page background with full-screen image |
Search bar Tabs layout with 2 columns Events grouped in tabs by Broadcast Date Custom label on broadcast date tabs (Day 1, 2, 3) |
| Enhanced Portal - Bar Layout | Left and right logos on white banner White registration form Page background with gradient image |
Search bar Tabs layout with 2 columns Events grouped in tabs by Broadcast Date Audience Chat, Ask a Question tabs (enhanced features) Custom tabs (Welcome Message, Presenters, Announcements) |
| Enhanced Portal - Open Layout | Left and right logos on white banner White registration form Page background with full-screen image |
Search bar Tabs layout with 2 columns Events grouped in tabs by Broadcast Date Custom label on broadcast date tabs (Day 1, 2, 3) Audience Chat, Ask a Question tabs (enhanced features) Custom tabs (Welcome Message, Presenters, Announcements) |
Branding Examples - Bar Layouts
Bar layouts feature the event title and date prominently in colored bars across the landing page. They offer one- and two-column layouts that set the structure of the landing page and placement of the registration form.

Visit these example events to compare different registration layouts, banners, colors, and background treatments. The events are branded for Alltrek and Reynholm Industries.

| Registration Layout | Brand | Registration Page Branding | Event Window Branding |
|---|---|---|---|
| One Column with background image | Alltrek | Left and right logos on white banner Light gray registration container (#F7F7F7) Page background with gradient image |
Slides and presenter video Sponsor logos White player container Light blue page background (#CBE2FE) |
| One Column with transparent banner | Alltrek | Left and right logos Transparent banner shows page background Light gray registration container (#F7F7F7) Light blue page background (#CBE2FE) |
Slides and presenter video Sponsor logos Transparent player container shows page background Light blue page background (#CBE2FE) |
| One Column with background color | Reynholm Industries | Left banner logo on white banner Transparent registration container shows page background Light yellow page background (#FCF7C5) |
Slides, presenter video, custom player tabs Sponsor logos White player container Light yellow page background (#FCF7C5) |
| One Column with background image | Reynholm Industries | Left banner logo on white banner Transparent registration container shows page background Transparent background image with blue circles shows page background Light yellow page background (#FCF7C5) |
Slides, presenter video, custom player tabs Sponsor logos Transparent player container shows page background Uses registration page background image and color |
| Two Column with transparent registration container | Alltrek | Left and right logos on white banner White registration form Transparent registration container shows page background Dark blue page background (#004491) |
Slides, presenter video, custom player tab Sponsor logos White player container Dark blue page background (#004491) |
| Two Column with white registration form | Alltrek | Left and right logos on white banner White registration form Light gray registration container (#F7F7F7) Page background with gradient image |
Slides, presenter video, custom player tab Sponsor logos White player container Light blue page background (#CBE2FE) |
| Two Column with blue registration form and background color | Reynholm Industries | Left banner logo on white banner Light blue registration form (#96B9D9) Transparent registration container shows page background Light yellow page background (#FCF7C5) |
Slides, presenter video, custom player tabs Sponsor logos White player container Light yellow page background (#FCF7C5) |
| Two Column with blue registration form and background image | Reynholm Industries | Left banner logo on white banner Light blue registration form (#96B9D9) Transparent registration container shows page background Transparent background image with blue circles shows page background Light yellow page background (#FCF7C5) |
Slides, presenter video, custom player tabs Sponsor logos Transparent player container shows page background Uses registration page background image and color |
| Two Column with transparent banner and background color | Reynholm Industries | Left and right logos Transparent banner shows page background color Transparent registration container shows page background Light yellow page background (#FCF7C5) |
Slides, presenter video, custom player tabs Sponsor logos White player container Light yellow page background (#FCF7C5) |
| Two Column with transparent banner and background image | Reynholm Industries | Left and right logos Transparent banner shows page background color Transparent registration container shows page background Transparent background image with blue circles shows page background Light yellow page background (#FCF7C5) |
Slides, presenter video, custom player tabs Sponsor logos Transparent player container shows page background Uses registration page background image and color |
| Popup Registration | Alltrek | Left and right logos on white banner White registration form can't be changed Light gray registration container (#F7F7F7) Page background with gradient image |
Slides, presenter video, custom player tabs Sponsor logos White player container Light blue page background (#CBE2FE) |
| Popup Registration with background color | Reynholm Industries | Left banner logo on white banner White registration form can't be changed Transparent registration container shows page background Light yellow page background (#FCF7C5) |
Slides, presenter video, custom player tabs Sponsor logos White player container Light yellow page background (#FCF7C5) |
| Popup Registration with background image | Reynholm Industries | Left banner logo on white banner White registration form can't be changed Transparent registration container shows page background Transparent background image with blue circles shows page background Light yellow page background (#FCF7C5) |
Slides, presenter video, custom player tabs Sponsor logos White player container Uses registration page background image and color |
| Video-only Event (no slides or content tabs) | Alltrek | Left and right logos on white banner White registration form Light gray registration container (#F7F7F7) Page background with gradient image |
Presenter video Sponsor logos White player container Light blue page background (#CBE2FE) |
Branding Examples - Open Layouts
Open layouts incorporate the event title and date in the body of the landing page. They feature full-page background images and more options for placement of the registration form.
Note: In Title Top layouts, you can set a background color for the registration container (the box that holds the registration form and landing page content). Side-by-side layouts don't have a registration container; landing page content displays over the page background.

Visit these example events to compare different registration layouts, banners, colors, and background treatments. The events are branded for Alltrek.
| Registration Layout | Registration Page Branding | Event Window Branding |
|---|---|---|
| Title Top, Right Registration with transparent banner | Left and right logos Transparent banner shows page background White registration form White registration container Page background with full-screen image |
Slides, presenter video, custom player tab Sponsor logos Transparent player container shows page background Dark green page background (#183200) |
| Title Top, Left Registration with a dark green registration container | Left and right logos on white banner White registration form Green registration container (#3A7821) Page background with full-screen image |
Slides, presenter video, custom player tab Sponsor logos Transparent player container shows page background Player background with full-screen image |
| Side-By-Side, Right Registration with background image | Left and right logos on white banner White registration form White landing page text over dark page background Page background with full-screen image |
Slides, presenter video, custom player tab Sponsor logos White player container Light green page background (#CDE9C8) |
| Side-By-Side, Left Registration with no banner | No banner (logos not uploaded) White registration form Black landing page text over light page background Light green background color (#CDE9C8) |
Slides and presenter video Sponsor logos White player container Light green page background (#CDE9C8) |
| Video-only Event (no slides or content tabs) | Left and right logos on white banner White registration form White landing page text over dark page background Page background with full-screen image |
Presenter video Sponsor logos Transparent player container shows page background White page background |
Event Branding
Add social sharing to the registration page
Let your attendees spread the word about an event on Twitter, LinkedIn, and Facebook, and then track registrations that originate from their posts.
Tip: To add the social sharing buttons to the event window or another site, copy the embed code and paste it in a custom tab or in the player footer.
When someone registers for the event from a social media post, a new campaign ID is automatically created and is visible on the Emails & Marketing tab under Campaign Source Tracking.
Notes:
This example shows the social sharing buttons on the registration page.

- On the Registration tab, scroll to the Customize Landing Page Content section and open Social Sharing.
- ClickManage Social Sharing.

- On the Social Sharing Settings window, select Enable Social Sharing and select the social media platforms you'd like attendees to share to.

- Under OpenGraph Tag Fields, review and customize the post.
- By default, the event title is set as the headline for LinkedIn posts. You can change this.
- Add a link to an image to include it in the post
- Enter your message in the Description field
- The event URL is added below the text. You can send readers to a different URL.
- Optionally, add a Twitter hashtag

- When finished, click Save Changes.
- Click Save and Continue.
Add sponsor logos to the event window
You can display logos of event sponsors and other call to action images during the event. The logos are included in the lower right corner of the event window, above the footer.
You can include as many sponsor logos as you like. Each logo displays for 10 seconds before switching to the next one. You can set the display order of the logos, the amount of time each logo is displayed, and include a link so that when attendees click on the logo, they're taken to the sponsor's website.
The maximum recommended size for sponsor logos is 400 x 70 pixels and no more than 100 MB each. If you upload a larger image, you will be prompted to crop or resize it in the image editor.
Note: The height of the player container adjusts to accommodate the logos and shifts the footer down. To prevent the footer from moving up and down when logos switch, make sure that all logos are the same height.
This example shows the event window with four sponsor logos that are displayed for 1 second.

To add sponsor logos to the event window:
- On the Player & Branding tab, scroll to the Branding Options section and open Add Sponsor Logos.

- Click Upload Sponsor Logo.
- Optional. Next to Links To, enter the URL of the web page to open when attendees click the logo.
- Click Choose FIle, select an image, and click Upload. Repeat steps 2-4 to add more sponsor logos.

- As you upload them, logos are added to a list. In the list, finalize the logos to display.
- Set the display sequence in the Order column
- Add or change destination links
- Set the display duration for each logo
- Click Edit Logo to crop, rotate, or resize the image. To use a different image, click Remove and upload a new image.

- Click Save and Continue.
Add text, images, and other media to the registration page
All registration layouts include a dedicated space for additional content. By default, this space - called the landing text - is empty. You can edit it and include additional event information, images, speaker headshots, links, and videos on your registration page. You can also add your own custom code or use auto-fields to include the event title, date, duration, or reminder buttons on the page.
The landing text area is in the registration container, either next to the registration form (open layouts and 2-column bar layout) or spanning the width of the registration container (one-column and popup registration bar layouts).
To add content to the registration page:
Go the Registration tab, scroll to the Customize Event Landing Page section, and open Landing Page Content. Next to Landing Text, select Custom to open the text editor.

When you first open the text editor, it includes auto-field placeholders for the event title, date, and the Add to Calendar button. If you want to include this information in the body of the page, clear the Title Bar Text and Date Bar Text fields so that it isn't duplicated.
Otherwise, at the right side of the editor, click </> to switch to code view and delete the placeholder code. Click </> again to switch back to the text editor view and add and format text, images, speaker headshots, links, and videos. Available auto-fields are displayed below the editor.

To learn more about auto-fields, see Auto-fields for event landing pages.
This example shows a registration page with an image, speaker headshots, and text.

Button and tab color | Open layouts
The highlight color sets the color of the buttons on the registration page and the primary and sidebar tabs in the event window.
Note: The text color is automatically set to white or black, to contrast with the highlight color. If you select a dark color, the text is white. If you select a light color, the text is black.
To change the highlight color:
Go to the Player & Branding tab. Open Advanced Branding and set the Highlight Color.
This example shows green buttons on the registration page and green tabs on the event window.

Buttons, tabs, and title bar color | Bar layouts
The highlight color sets the color of the title bar, buttons, and the ruling line above the footer on the registration page. The highlight color is also used for the primary and sidebar tabs in the event window.
Note: The text color is automatically set to white or black, to contrast with the highlight color. If you select a dark color, the text is white. If you select a light color, the text is black.
To set the color for buttons, tabs, and the title bar:
Go to the Player & Branding tab. Open Advanced Branding and set the Highlight Color.
This example shows a blue title bar and buttons on the registration page and blue tabs on the event window.

Customize landing page headings, links, and buttons
For events and attendee portals.
A landing page contains the event title (or portal title), date and time (events only), a registration form, a login form (for people already registered), and custom content you add. You can customize the text labels for headings, links, and buttons on the registration form, and the Add to Calendar button. In the Webcast Admin portal, these are called landing page labels.
The labels available depend on the registration layout you chose on the Player & Branding tab (for events) or Branding tab (for portals). To learn more, see Landing page labels | Open layouts and Landing page labels | Bar layouts .
Jump to: Edit landing page labels | Available labels
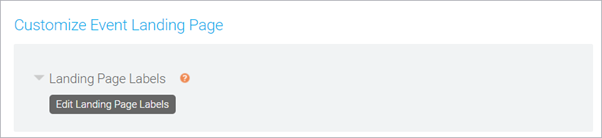
Edit landing page labels
- Sign in to the Webcast Admin portal and edit the event or portal.
- On the left panel, click the Registration tab.
- Under Customize Event Landing Page, expand the Landing Page Labels section and click Edit Landing Page Labels.

- Enter the new text for the headings, links, and buttons.

- Click Save Changes to save the text. Then click Save and Continue to save changes to the landing page.
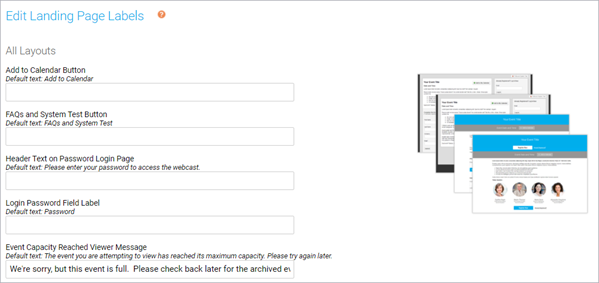
Available labels
All Layouts section
These labels are displayed on all registration layouts.
| Field Name | Description |
|---|---|
| Add to Calendar Button | The button next to the event date that allows viewers to download a calendar reminder |
| FAQs and System Test Button | The link in the footer that opens the viewer system test and troubleshooting tips |
| Login Password Field Label | The text for the password field on the registration and login form. Applies if you selected Password Protect Login on the Security tab. |
| Event Capacity Reached Viewer Message | The message displayed on the landing page when the event is full |
Additional Layouts section
| Field Name | Description | Applies to |
|---|---|---|
| Text Above Register Form | The heading above the registration form | One and Two Column bar layouts All open layouts |
| Register Form Required Notice | The link in the footer that opens the viewer system test and troubleshooting tips | One and Two Column bar layouts |
| Register Form Submit Button | On the landing page, the button viewers click to register | One and Two Column bar layouts All open layouts |
| Text Above Login Form | The heading above the login form | One and Two Column bar layouts All open layouts |
| Login Form Submit button | The button viewers click to log in | One and Two Column bar layouts All open layouts |
Popup Registration section
| Field Name | Description | Applies to |
|---|---|---|
| Register Form Header and Submit Button | On the landing page, the button viewers click to register. On the popup registration form, the heading and the submit button. | Popup Registration bar layout |
| Login Form Header and Submit Button | On the landing page, the button viewers click to log in. On the popup login form, the heading and the submit button. | Popup Registration bar layout |
| Register Form Login Link | The "Already registered?" link on the landing page and registration form that opens the popup login form | Popup Registration bar layout All open layouts |
| Login Form Register Link | On the popup login form, the "Not registered?" link on the login form that opens the popup registration form | Popup Registration bar layout All open layouts |
Customize the event title and date | Bar layouts
By default, the registration page includes the event title in the title bar and the event date and time and a calendar reminder button in the date bar. You can change the bar colors and update the text displayed. You can also hide the title bar, date bar, or both.
Jump to: Set the bar colors | Change the bar text
Set the bar colors
Customize the colors of the title and date bars to match your brand.
To set the bar colors:
Go to the Player & Branding tab. Open Advanced Branding and for the:
- Title Bar, set the Highlight Color
- Date Bar, set the Date Bar Color
The Highlight Color also sets the color of the buttons on the registration page and the buttons and tabs on the event window. To learn more, see Buttons, tabs, and title bar color | Bar layouts.
Note: The text color is automatically set to white or black, to contrast with the bar color. If you select a dark color, the text is white. If you select a light color, the text is black.
This example shows the title bar and date bar colors on the registration page.

Change the bar text
The registration page automatically displays the event title in the title bar and the date and time, and calendar reminder button in the date bar. This information is included by the __TITLE__, __DATE__, and __REMINDERBUTTON__ auto-fields. The benefit of auto-fields is that they automatically update when you make any changes to your event title or date on the Event Settings tab.

You can:
- Edit the text and provide additional event details or manually change the date and time
- Rearrange the auto-fields or include other auto-fields
- Hide the title bar or date bar by removing the text
For example:
- If you'd like to allow attendees to register for a Simulated Live event before scheduling a broadcast, you can update the event date and time to reflect the planned broadcast date.
- The original broadcast date and time are displayed on Live event replays. After the Live event, you can remove the date bar to avoid confusing attendees.
To change the text:
Go to the Registration tab. Scroll to the Customize Landing Page Content section and open Landing Page Content.
This example shows the registration page without a date bar. (Date Bar Text is empty.)

Customize the event title and date | Open layouts
By default, the registration page includes the event title, the event date and time, and a calendar reminder button. For Title Top layouts, these elements are centered on the page, above the registration form and the landing page content. For Side-by-Side layouts, they are included in the landing page content area next to the registration form. You can update the text displayed or hide the title, date, or both.
This information is included by the __TITLE__, __DATE__, and __REMINDERBUTTON__ auto-fields. The benefit of auto-fields is that they automatically update when you make any changes to your event title or date on the Event Settings tab.
Note: The color of the title and date text depends on the background color you select. If you select a dark color, the text is white. If you select a light color, the text is black. To learn more about backgrounds, see Registration page background and form and content area colors.
To change the text:
Go to the Registration tab. Scroll to the Customize Landing Page Content section and open Landing Page Content.

You can:
- Edit the text and provide additional event details or manually change the date and time
- Rearrange the auto-fields or include other auto-fields
- Hide the title or date by removing the text
For example:
- If you'd like to allow attendees to register for a Simulated Live event before scheduling a broadcast, you can update the event date and time to reflect the planned broadcast date.
- The original broadcast date and time are displayed on Live event replays. After the Live event, you can remove the date bar to avoid confusing attendees.
This example shows the registration page without a date.

Event player container and window backgrounds
The event window is made up of two layers: the player page background and the player container. The player page background is simply a background color or image. The player container holds the video player, event content tabs, sponsor logos, and the footer. When you add sponsor logos or content to the footer, the player container expands.
Jump to: Set the player container color | Set the event window background
This example shows the event window background behind a white player container.
Set the player container color
You can set the player container to white or transparent:
- Use white to visually group elements
- Use transparent to showcase the background color or image
To set the player container color:
Go to the Player & Branding tab. Open Advanced Branding and set the Player Container Color.
This example shows a white player container on the event window.

Set the event window background
The event window background displays behind the player container. By default, the player page background displays the same background color or image as the landing page. You can select a background color, upload a background image, or both. (Set the banner to transparent to have the player background show through.)
Background images are centered and repeat horizontally. We recommend uploading a horizontally repeating image, or gradient, or an image at least 1900 x 1200 pixels.
Choose a background image that is roughly as tall as the player container will be. The player container gets taller to accommodate footer content and sponsor logos, but background images don’t scale vertically to fill the space. The background color is displayed where the background image ends.
To set the event window background:
Go to the Player & Branding tab. Open Advanced Branding, clear the Use Reg Background Color and Use Reg Background Image checkboxes, and then set the Reg Page Background color.

To upload a background image, click Upload Player Background Image.
This example shows a gradient background image that can be repeated across the registration page and an image that can be stretched.
|
Background Gradient |
Background Image | |
|

This example shows the player page background color in the event window.

Registration page background and form and content area colors
The body of the registration page is contained in three layers: under everything is the page background color or image. Next is the registration container which holds the landing page content and registration form. Finally, with a two-column layout, the form container holds the registration form.
You can set a color for each layer and upload a background image; you can also set the registration container to transparent to allow the page background to show through.
Jump to: Set the registration form color | Set the content area background color | Set the registration page background
This example shows the layers in a two-column bar layout.

Set the registration form color
In a two-column layout, you can set the background color of the registration form. Remember that the highlight color sets the color of buttons; select a color that contrasts well.
To set the registration form color:
Go to the Player & Branding tab. Open Advanced Branding and set the Form Container Color.
This example shows a white form container on the registration page.

Set the content area background color
The registration container color is the background color for the landing page content and the registration form.
You can:
- Set a color to make it stand out from the page background
- Set it to transparent to showcase the background color or image
- For the two-column layout, set it to the same color as the form container for a unified look
Note: When using a transparent registration container on a dark page background, you might need to adjust the text color for the landing page content to make it visible.
To set the content area color:
Go to the Player & Branding tab. Open Advanced Branding and set the Registration Container Color.
This example shows a light gray registration container with a white registration form (form container).
Set the registration page background
The registration page background displays behind the registration container. You can select a background color, upload a background image, or both. (Set the banner to transparent to have the page background color show through.)
Background images are centered and repeat horizontally. We recommend uploading a horizontally repeating image, or gradient, or an image at least 1900 x 1200 pixels.
Choose a background image that is roughly as tall as the registration container will be. The registration container gets taller to accommodate long registration forms and landing page content, but background images don’t scale vertically to fill the space. The background color is displayed where the background image ends.
To set the registration page background:
Go to the Player & Branding tab. Open Advanced Branding and set the Reg Page Background.

To upload a background image, click Upload Background Image.
This example shows a gradient background image that can be repeated across the registration page and an image that can be stretched.
|
Background Gradient |
Background Image | |
|
This example shows a gradient image as the background on the registration page.

Set up the banner and logos
Add banner logos
You can include your organization’s logos or images related to the event in the banner. These images are anchored to the left and right sides of the registration page and event window. You can display a left logo, a right logo, or both. To hide the banner, don’t upload either logo.
The recommended size for logos is 300 x 75 pixels, with a transparent background. The maximum recommended width for both logos combined is 900 pixels for bar layouts and 1200 pixels for open layouts.
Go to the Player & Branding tab and scroll to the Branding Options section. To add a:
- Left logo, under the Banner Logo section, click Upload Banner Logo
- Right logo, open Advanced Branding, and under Right Banner Logo, click Upload Right Banner Logo
This example shows both logos on the registration page and the event window.

This example shows an event with the banner hidden. (Logos are not uploaded.)

Add alt text
Include alt text for your banner logos to make your event more accessible. Alt text is the text that accompanies the logos and is read aloud by screen readers. It provides context and describes the images for visually impaired attendees.
To add alt text to logos:
After you upload your logos, next to Alt Tag, enter your alt text.
Set the banner color
- Registration page background color on the registration page banner
- Player page background color or image on the event window banner
Note: Background images do not display in the banner on the registration page.
Go to the Player & Branding tab. Open Advanced Branding and set the Banner Color.
This example shows a white banner on the registration page and the event window.

Use the text editor to customize events and emails
Jump to: Add images | Add speaker headshots | Add links | Embed videos | Add a Twitter feed
When you select the Custom option for the landing page content, footers, custom players tabs, and event emails, it opens the text editor.
The following table shows the elements you can customize and the content you can add.
| Element | Go to this tab and select... | Things you can add |
|---|---|---|
| Landing Page Content | Registration tab. Landing Page Content > Landing Text > Custom | Text, images, links, videos, speaker details |
| Registration Footer | Registration tab. Registration Footer > Edit Registration Page Footer | Text, images, links, videos, speaker details, Twitter feed |
| Player Footer | Event Content tab. Player Footer > Manage Player Footer | Text, images, links, videos, speaker details, Twitter feed |
| Custom Player Tabs | Event Content tab. Add Custom Player Tabs | Text, images, links, videos, speaker details, Twitter feed |
| Registration Confirmation, Event Reminder, and Follow-up Emails | Email & Marketing tab:
|
Text, images, links |
Add images
To add images:
- On the toolbar, click the Insert Image button.

- Click Choose File, select the image, and then click Upload.
- Optional. Resize, rotate, crop, or add text to the image before adding it. You can also add padding to the image by resizing the canvas and set the background color for the canvas.
- When finished editing, click Insert.
Add speaker headshots
Tell your audience about your presenters and add speaker details, including their photo, name, title, and company. Headshots must be at least 300x300 pixels and preferably the same height and width.
To add headshots:
- On the toolbar, click the Speaker Details button.

- Under Display Settings, choose a layout for the speaker details, select the image shape, and use the slider to set the headshot image size.

- Under Speaker List, in the Photo column, click Upload Photo.

- Click Choose File, select the image, and then click Upload.
- If your image is a rectangle, point to the image and drag to center it within the guides, and then click Apply to crop the image.

- Optional. Rotate or add text to the image.
- Click Save.
- In the Details column, enter the name of the presenter, their title, and company name.
- To add details for another presenter, click + Add More Headshots and repeat steps 3 to 8.
- When finished, close the Add Speaker Details window.
Add links
To add links:
- On the toolbar, click the Insert Link button. To turn text into a link, type the text and select it, and then click the Insert Link button.

- Enter the URL and link text.
If you highlighted the link text, it is already entered in the Text field.

- Click Insert.
Embed videos
You can embed a video from YouTube, Vimeo, and Brightcove using its shareable URL.
To embed videos:
- On the toolbar, click the Insert Video button.

- Enter the video URL. If the Autoplay option is available, you can select it to play the video when an attendee lands on the page.

- Click Insert.
- Optional. By default, the video size is 640x360. To change the size of the video, click </> to switch to code view and change the height and width of the iFrame.
Add a Twitter feed
You can add a real-time feed of a Twitter timeline to the registration page footer and to the event window in the footer or as a custom player tab.
To add a Twitter feed:
- On the toolbar, click the Twitter button.

- In the Embed a Twitter Widget window, select User Timeline and enter the @username of the feed you want to embed.

- Click Embed Widget.
- Optional. By default, the feed size is set to 100%. To change the size of the feed, click </> to switch to code view and change the height and width of the iFrame.