About the video bridge (moderators)
As a moderator, you have full control of presenters and video bridge functions. You can share your webcam, share your screen or an application window (720p events only), and manage your own event experience. Click on a presenter's name to hide their webcam, mute their audio, update their name, promote them to a moderator, and disconnect them from the video bridge.
If you're using an advanced video bridge, you can also lock the Live Studio to prevent other presenters from joining, dial out to a Microsoft Teams or Zoom room or Skype for Business using a SIP, H.323, or RTMP connection, and stream to an external platform like Youtube Live or Facebook Live.
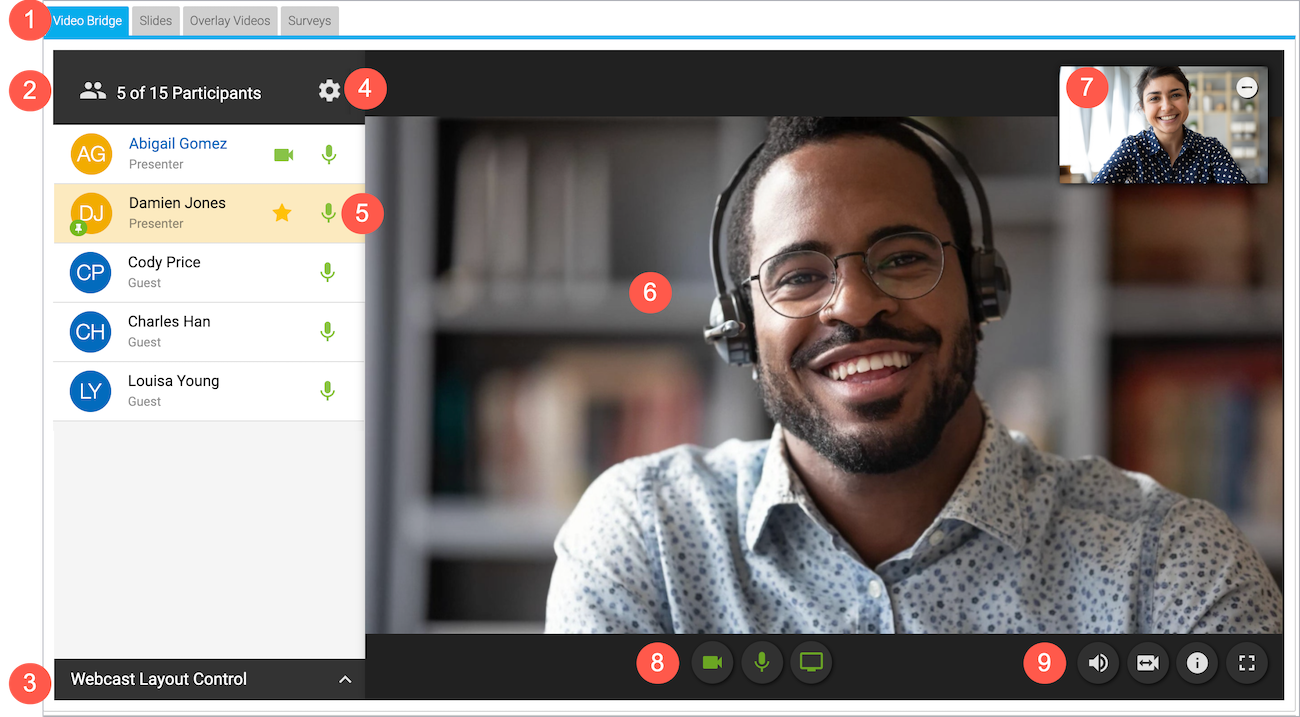
The following example shows the moderator view of the video bridge with a 720p video player and advanced video bridge turned on.
Use the following table to learn more about the video bridge controls and options.
| Number | Element | Description |
|---|---|---|
| 1 | Live Studio tabs | Controls for different aspects of the event are grouped into tabs. Click the Video Bridge tab to manage your own webcam and audio, select a webcam layout, and to manage presenter webcams and audio.
Controls for slides, surveys, overlay videos, and other content you uploaded to the event are displayed in their own tabs next to the Video Bridge tab. |
| 2 | Presenter list |
The moderators and presenters who are connected to the video bridge, listed alphabetically. You and other moderators (with Presenter role) are listed first, followed by all other presenters (with Guest role). Click a presenter’s row to mute their mic, promote them to moderator, change their display name, and disconnect them. |
| 3 | Webcast layout controls | Click Webcast Layout Control and choose whether to automatically switch between presenters' webcams as they speak (voice-activated switching), include their names on the screen, and how webcams are arranged on stage (one webcam or multiple in a grid view or filmstrip view). To learn more, see Change the presenter webcam layout on the video bridge. |
| 4 | Advanced video bridge settings | Additional options for advanced video bridge. Click the Settings (gear) button to lock the Live Studio and prevent other presenters from joining, dial out to an external meeting room, and livestream to an external platform. |
| 5 | Pinned presenters | A pin next to a presenter's name indicates their webcam is pinned on stage (voice-activated camera switching is off). If a presenter is pinned in the Single Speaker layout or pinned to a large frame in a Filmstrip layout, their row is highlighted yellow and a star is displayed next to their name. |
| 6 | Active talker | The webcam of the presenter who is speaking. By default, Voice Activated Camera Switching is turned on and highlights the webcam of the presenter who is speaking (and recent speakers when using a Grid or Filmstrip layout). There is also a speaker icon that is displayed in the presenter's row in the presenter list while they're talking.
To choose whose webcams are on stage, turn off voice-activated switching and Pin presenter webcams on the video bridge. |
| 7 | Your webcam view | A live view of your webcam. Click the Hide (-) button to hide your self-view. |
| 8 | Your video bridge controls | Turn your webcam on or off, mute or unmute your audio, and share your screen (720p only). |
| 9 | Additional video bridge controls | Change your audio output volume and device, change your webcam and microphone connection, check event streaming details, and expand the Video Bridge tab full screen. |